> ## Documentation Index
> Fetch the complete documentation index at: https://www.mellowtel.com/docs/llms.txt
> Use this file to discover all available pages before exploring further.
# 在你的 Chrome/Edge 扩展中集成 Mellowtel
在这里,你将看到如何在你的 Chrome/Edge 扩展项目中实现 Mellowtel 库。
预计完成时间:5-7 分钟。
# 符合浏览器政策
如果集成尊重用户的选择和设置,Mellowtel 符合浏览器政策。
官方的 Mellowtel 插件在 Chrome 和 Edge 上可用。我们很快也会将它们提交到其他主要浏览器。
Chrome: [https://chromewebstore.google.com/detail/support-with-mellowtel/jngbedjpioeongcicaomeideeompcbcc](https://chromewebstore.google.com/detail/support-with-mellowtel/jngbedjpioeongcicaomeideeompcbcc)
Edge: [https://microsoftedge.microsoft.com/addons/detail/support-with-mellowtel/chpomjnojnimgcaomhmcmfgjinfoekhi](https://microsoftedge.microsoft.com/addons/detail/support-with-mellowtel/chpomjnojnimgcaomhmcmfgjinfoekhi)
在 Chrome 上,一些开发者可能会在审核过程中遇到单一功能政策的问题,该政策规定插件只能有一个明确说明的功能(但在多功能扩展中常常被不一致地解释)。
在这些情况下,我们建议开发者分享他们的个人链接,并要求用户安装官方的 Mellowtel Chrome 插件,该插件的唯一目的是允许开发者通过分享用户的闲置资源来获得支持。
开发者可以从 [Mellowtel 仪表盘](https://www.mellowtel.com/dashboard/support-with-mellowtel) 创建他们的链接,并将用户重定向到官方的 [Mellowtel Chrome 插件](https://chromewebstore.google.com/detail/support-with-mellowtel/jngbedjpioeongcicaomeideeompcbcc)。
如果你在 Chrome 上有一个在 AI 带宽共享领域运作的插件,并且这是插件的唯一目的,你可以直接在你的插件中集成 Mellowtel。
而 Edge、Firefox 或 Safari 没有这种政策,因此开发者也可以直接在他们的产品中集成库,并确保询问用户是否愿意支持他们,并始终让用户可以随时从插件本身轻松更改他们的设置。
# 推荐浏览器
目前,我们建议在 Edge 插件中集成 Mellowtel,因为我们仍在优化库的 Firefox 和 Safari 版本。
# 要求
在开始之前,请确保:
1. 你的插件正在使用 [Manifest V3](https://developer.chrome.com/docs/extensions/develop/migrate/what-is-mv3)。
2. 你的代码是以编译的方式组织的,使用 Webpack、Rollup 或其他打包工具。
如果你没有设置打包工具,首先按照[这里](/browser-plugins/static-to-webpack)的指南进行操作。
# 安装 npm 包
要安装 npm 包,你可以在终端中运行以下命令:
```npm theme={null}
npm install mellowtel
```
如果你使用 yarn 作为包管理器,你可以运行以下命令:
```yarn theme={null}
yarn add mellowtel
```
# 决定实现方式
你可以通过两种方式在你的扩展中实现库。
如果你打算第一次在 Web Store 上发布扩展,请遵循选项 1。
如果你已经在 Web Store 上发布了扩展,请阅读“如何决定?”
### 如何决定?
当你从 Web Store 安装扩展时,是否会弹出一个警告窗口,要求许可“读取和更改你在所有网站上的所有数据”?
它看起来像这样:
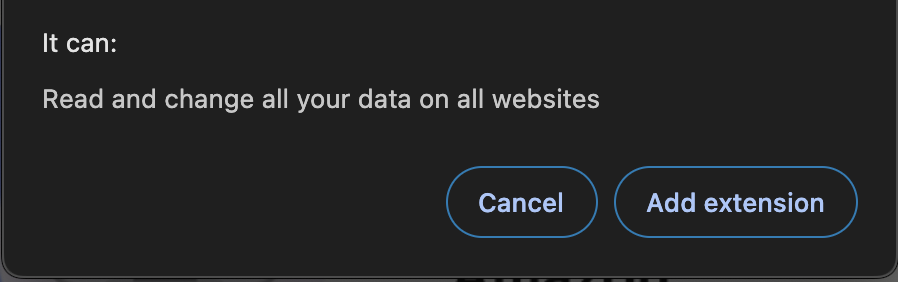 如果是这样,你可以遵循选项 1。如果不是,你需要遵循选项 2。
# 选项 1
如果你是第一次在 Web Store 上发布扩展,或者你正在将库导入到一个要求在所有网站上操作权限的扩展中,你可以遵循选项 1。
### 设置你的 manifest
在你的 [manifest.json](https://developer.chrome.com/docs/extensions/reference/manifest) 文件中,像这样修改 `permissions` 和 `host_permissions` 部分:
```json theme={null}
{
"permissions": [
"storage",
"declarativeNetRequest"
],
"host_permissions": [
"\u003Call_urls\u003E"
]
}
```
### 设置你的服务工作者(后台脚本)
在你的 [服务工作者](https://developer.chrome.com/docs/extensions/develop/concepts/service-workers) 文件中,你需要导入 `mellowtel` 包。
注意:服务工作者也被称为 `后台脚本`。
你可以通过将 `configuration_key` 替换为你自己的密钥,将以下代码复制并粘贴到你的服务工作者文件中。
```javascript theme={null}
import Mellowtel from "mellowtel";
let mellowtel;
(async () => {
mellowtel = new Mellowtel(""); // 替换为你的配置密钥
await mellowtel.initBackground();
})();
```
导入 mellowtel 包
```javascript theme={null}
import Mellowtel from "mellowtel";
```
然后你可以使用 `Mellowtel(configuration_key, options?)` 创建一个新的 Mellowtel 对象实例。Mellowtel 对象是你进入 Mellowtel SDK 的入口。调用此函数时需要你的 `configuration_key`,因为它标识你的扩展到 Mellowtel。你可以在 [仪表盘](https://www.mellowtel.com/mellowtel-dashboard/#home) 中找到你的 `configuration_key`
```javascript theme={null}
mellowtel = new Mellowtel("");
```
通过调用 `initBackground` 方法初始化 Mellowtel。此方法将初始化 Mellowtel 对象并设置必要的监听器。
```javascript theme={null}
await mellowtel.initBackground();
```
### 设置你的内容脚本
你还需要在 [内容脚本](https://developer.chrome.com/docs/extensions/develop/concepts/content-scripts) 中导入 mellowtel 包。
此内容脚本应在 `all_frames` 和 `` 的 `document_start` 中运行。
我们建议创建一个新的内容脚本(例如 content\_start\_mellowtel.js),你可以在其中复制并粘贴以下代码。
将 `configuration_key` 替换为你自己的密钥。
```javascript theme={null}
import Mellowtel from "mellowtel";
(async () => {
const mellowtel = new Mellowtel(""); // 替换为你的配置密钥
await mellowtel.initContentScript();
})();
```
然后记得在你的 `manifest.json` 文件中的 content\_scripts 部分添加此内容脚本以及你已经拥有的任何其他内容脚本。
你可以通过将 `name_of_your_content_script.js` 更改为你选择的名称来复制并粘贴以下代码。
```json theme={null}
{
"content_scripts": [
{
"matches": [""],
"js": [""], // <-- 在此处更改为你的内容脚本名称
"run_at": "document_start",
"all_frames": true
}
]
}
```
### 设置选择加入/选择退出逻辑
为了激活 Mellowtel,用户需要明确选择加入服务。
你可以通过两种方式实现选择加入/选择退出逻辑:
1. 使用 Mellowtel 提供的预构建页面的推荐实现。
2. 创建你自己的自定义选择加入/选择退出元素,并使用[此处](https://docs.mellowtel.com/concepts/opt-in-out#2-custom-elements)显示的方法
如果选择创建你自己的选择加入/选择退出元素,请考虑使用 **Mellowtel 元素** - 预构建的 UI 组件,处理用户同意和设置,集成工作量最小。
如果你使用推荐的实现,打开你的 `服务工作者` 文件(也称为后台脚本)并添加以下代码:
```javascript theme={null}
chrome.runtime.onInstalled.addListener(async function(details) {
console.log("扩展已安装或更新");
// 如果你想分别处理首次安装和更新
/**
if(details.reason === "install"){
// 调用一个函数来处理首次安装
} else if(details.reason === "update") {
// 调用一个函数来处理更新
}
**/
await mellowtel.generateAndOpenOptInLink();
});
```
### 生成设置链接
为了让你的用户完全控制他们的带宽,要求你留下一个易于访问的方式,让他们随时更改他们的设置。
你可以使用 `generateSettingsLink()` 方法生成一个链接。
此方法将返回一个链接,该链接将打开 Mellowtel 设置页面,用户可以随时决定是否选择加入或选择退出。
此链接应放置在弹出窗口、选项页面或用户可以轻松访问的任何其他地方。
例如,你可以将其放在一个 `openSettings()` 函数中。你可以在按钮点击或任何其他相关事件上调用 `openSettings()`:
```javascript theme={null}
async function openSettings() {
try {
// 生成并管理设置链接
const settingsLink = await mellowtel.generateSettingsLink();
// 记录生成的链接以进行调试
console.log("生成的设置链接:", settingsLink);
// 你现在可以在弹出窗口、选项页面或任何 UI 元素中使用此链接
} catch (error) {
console.error("生成设置链接时出错:", error);
}
}
```
完美!现在你已准备好将你的扩展发送到 Web Store。请按照此处的指南查看如何[提交你的扩展](/browser-plugins/submit-to-chrome-store)
# 选项 2
选项 2 如果未正确实施,可能会禁用你的扩展。这就是为什么它不是对所有用户都可用
如果你无法实施选项 1,请通过 [Discord](https://discord.com/invite/txAZp4MSDe) 联系我们。
如果是这样,你可以遵循选项 1。如果不是,你需要遵循选项 2。
# 选项 1
如果你是第一次在 Web Store 上发布扩展,或者你正在将库导入到一个要求在所有网站上操作权限的扩展中,你可以遵循选项 1。
### 设置你的 manifest
在你的 [manifest.json](https://developer.chrome.com/docs/extensions/reference/manifest) 文件中,像这样修改 `permissions` 和 `host_permissions` 部分:
```json theme={null}
{
"permissions": [
"storage",
"declarativeNetRequest"
],
"host_permissions": [
"\u003Call_urls\u003E"
]
}
```
### 设置你的服务工作者(后台脚本)
在你的 [服务工作者](https://developer.chrome.com/docs/extensions/develop/concepts/service-workers) 文件中,你需要导入 `mellowtel` 包。
注意:服务工作者也被称为 `后台脚本`。
你可以通过将 `configuration_key` 替换为你自己的密钥,将以下代码复制并粘贴到你的服务工作者文件中。
```javascript theme={null}
import Mellowtel from "mellowtel";
let mellowtel;
(async () => {
mellowtel = new Mellowtel(""); // 替换为你的配置密钥
await mellowtel.initBackground();
})();
```
导入 mellowtel 包
```javascript theme={null}
import Mellowtel from "mellowtel";
```
然后你可以使用 `Mellowtel(configuration_key, options?)` 创建一个新的 Mellowtel 对象实例。Mellowtel 对象是你进入 Mellowtel SDK 的入口。调用此函数时需要你的 `configuration_key`,因为它标识你的扩展到 Mellowtel。你可以在 [仪表盘](https://www.mellowtel.com/mellowtel-dashboard/#home) 中找到你的 `configuration_key`
```javascript theme={null}
mellowtel = new Mellowtel("");
```
通过调用 `initBackground` 方法初始化 Mellowtel。此方法将初始化 Mellowtel 对象并设置必要的监听器。
```javascript theme={null}
await mellowtel.initBackground();
```
### 设置你的内容脚本
你还需要在 [内容脚本](https://developer.chrome.com/docs/extensions/develop/concepts/content-scripts) 中导入 mellowtel 包。
此内容脚本应在 `all_frames` 和 `` 的 `document_start` 中运行。
我们建议创建一个新的内容脚本(例如 content\_start\_mellowtel.js),你可以在其中复制并粘贴以下代码。
将 `configuration_key` 替换为你自己的密钥。
```javascript theme={null}
import Mellowtel from "mellowtel";
(async () => {
const mellowtel = new Mellowtel(""); // 替换为你的配置密钥
await mellowtel.initContentScript();
})();
```
然后记得在你的 `manifest.json` 文件中的 content\_scripts 部分添加此内容脚本以及你已经拥有的任何其他内容脚本。
你可以通过将 `name_of_your_content_script.js` 更改为你选择的名称来复制并粘贴以下代码。
```json theme={null}
{
"content_scripts": [
{
"matches": [""],
"js": [""], // <-- 在此处更改为你的内容脚本名称
"run_at": "document_start",
"all_frames": true
}
]
}
```
### 设置选择加入/选择退出逻辑
为了激活 Mellowtel,用户需要明确选择加入服务。
你可以通过两种方式实现选择加入/选择退出逻辑:
1. 使用 Mellowtel 提供的预构建页面的推荐实现。
2. 创建你自己的自定义选择加入/选择退出元素,并使用[此处](https://docs.mellowtel.com/concepts/opt-in-out#2-custom-elements)显示的方法
如果选择创建你自己的选择加入/选择退出元素,请考虑使用 **Mellowtel 元素** - 预构建的 UI 组件,处理用户同意和设置,集成工作量最小。
如果你使用推荐的实现,打开你的 `服务工作者` 文件(也称为后台脚本)并添加以下代码:
```javascript theme={null}
chrome.runtime.onInstalled.addListener(async function(details) {
console.log("扩展已安装或更新");
// 如果你想分别处理首次安装和更新
/**
if(details.reason === "install"){
// 调用一个函数来处理首次安装
} else if(details.reason === "update") {
// 调用一个函数来处理更新
}
**/
await mellowtel.generateAndOpenOptInLink();
});
```
### 生成设置链接
为了让你的用户完全控制他们的带宽,要求你留下一个易于访问的方式,让他们随时更改他们的设置。
你可以使用 `generateSettingsLink()` 方法生成一个链接。
此方法将返回一个链接,该链接将打开 Mellowtel 设置页面,用户可以随时决定是否选择加入或选择退出。
此链接应放置在弹出窗口、选项页面或用户可以轻松访问的任何其他地方。
例如,你可以将其放在一个 `openSettings()` 函数中。你可以在按钮点击或任何其他相关事件上调用 `openSettings()`:
```javascript theme={null}
async function openSettings() {
try {
// 生成并管理设置链接
const settingsLink = await mellowtel.generateSettingsLink();
// 记录生成的链接以进行调试
console.log("生成的设置链接:", settingsLink);
// 你现在可以在弹出窗口、选项页面或任何 UI 元素中使用此链接
} catch (error) {
console.error("生成设置链接时出错:", error);
}
}
```
完美!现在你已准备好将你的扩展发送到 Web Store。请按照此处的指南查看如何[提交你的扩展](/browser-plugins/submit-to-chrome-store)
# 选项 2
选项 2 如果未正确实施,可能会禁用你的扩展。这就是为什么它不是对所有用户都可用
如果你无法实施选项 1,请通过 [Discord](https://discord.com/invite/txAZp4MSDe) 联系我们。